
How to Make a First Aid Box
A first aid box is a container that holds essential medical supplies for treating minor injuries and emergencies. Having a first aid box at home, in your car, or your workplace can help you deal with unexpected situations and provide basic care until professional help arrives. Making your aid box is easy and inexpensive, and you can customize it according to your needs and preferences. Here are some steps to guide you through the process.
Part 1: Choosing a Container
– The first step is to choose a suitable container for your first aid box. You can use any box that is roomy, sturdy, water-resistant, and easy to open and close. Some examples are plastic bins, metal tins, lunch boxes or backpacks.
– Make sure the container has a handle or a strap for easy carrying. You can also attach a shoulder strap or a belt loop to make it more portable.
– Choose a container that is translucent or has a clear lid, so you can see the contents inside without opening it. This will help you find what you need quickly and keep track of what you have.
– Label the container clearly with the words “First Aid” or a red cross symbol. You can use stickers, markers, or paint to do this. You can also add your name, phone number, and any medical information that might be useful in an emergency.
Part 2: Stocking the Box
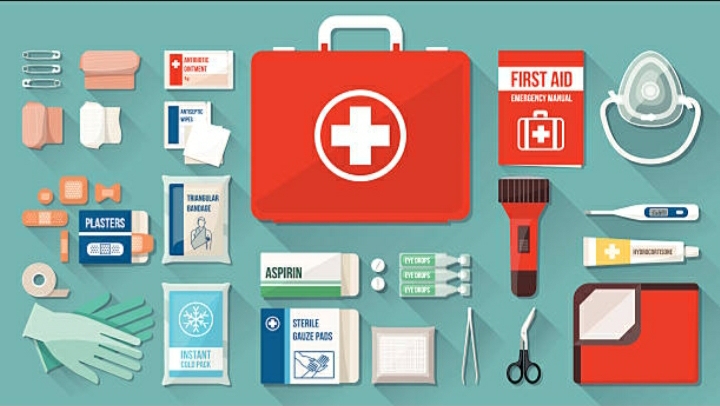
– The next step is to fill your first aid box with essential items that can help you treat common injuries and conditions. You can buy pre-packaged first aid kits from pharmacies or online, or you can assemble your own from individual supplies. Here are some items that you should include in your first aid box:
– Bandages: You will need different types and sizes of bandages to cover wounds, stop bleeding, and prevent infection. Some examples are adhesive bandages, gauze pads, sterile dressings, elastic bandages, and butterfly closures.
– Tape: You will need tape to secure bandages, dressings, and splints. Some examples are medical tape, duct tape, or masking tape.
– Scissors: You will need scissors to cut bandages, tape, clothing, or other materials. Choose scissors that are sharp, sturdy, and easy to clean. You can also use a knife or a razor blade as an alternative.
– Tweezers: You will need tweezers to remove splinters, thorns, ticks, or other foreign objects from the skin. Choose tweezers that are fine-tipped, metal, and easy to sterilize.
– Gloves: You will need gloves to protect your hands from blood, fluids, or germs when treating wounds or performing CPR. Choose gloves that are latex-free, disposable, and fit well.
– Antiseptic: You will need antiseptic to clean wounds, prevent infection, and soothe pain. Some examples are alcohol wipes, hydrogen peroxide, iodine, or saline solution.
– Ointment: You will need ointment to apply on wounds after cleaning them to promote healing and prevent scarring. Some examples are antibiotic cream, hydrocortisone cream, or aloe vera gel.
– Pain relievers: You will need pain relievers to reduce inflammation, fever, or discomfort caused by injuries or illnesses. Some examples are aspirin, ibuprofen, acetaminophen, or naproxen.
– Antihistamines: You will need antihistamines to treat allergic reactions caused by insect bites, stings, food, or medication. Some examples are diphenhydramine (Benadryl), loratadine (Claritin), or cetirizine (Zyrtec).
– anti-diarrhoeal: You will need antidiarrheals to treat diarrhoea caused by food poisoning, infection, or medication. Some examples are loperamide (Imodium), bismuth subsalicylate (Pepto-Bismol), or activated charcoal.
– Oral rehydration salts: You will need oral rehydration salts to prevent dehydration caused by diarrhoea, vomiting, or excessive sweating. You can buy ready-made packets or make your own by mixing 6 teaspoons of sugar and 1/2 teaspoon of salt in 1 litre of clean water.
– Thermometer: You will need a thermometer to measure body temperature and check for fever. You can use a digital, mercury, or alcohol thermometer, or a forehead strip. Make sure you know how to use it correctly and clean it after each use.
– CPR mask: You will need a CPR mask to perform mouth-to-mouth resuscitation on someone who is not breathing. A CPR mask is a plastic device that fits over the mouth and nose of the victim and has a one-way valve that prevents the exchange of fluids. You can also use a clean cloth or a handkerchief as an alternative.
– Splints: You will need splints to immobilize broken bones or sprained joints. You can use commercial splints, wooden boards, cardboard, or rolled-up magazines as splints. You will also need tape, bandages, or cloth to secure them.
– Cold packs: You will need cold packs to reduce swelling, pain, or bleeding caused by injuries or burns. You can use commercial cold packs, ice cubes wrapped in a cloth, or frozen vegetables as cold packs. Do not apply them directly on the skin, but use a cloth or a towel as a barrier.
– Blanket: You will need a blanket to keep someone warm, comfortable, or covered in an emergency. You can use any blanket that is clean, dry, and large enough to wrap around the person. You can also use a sleeping bag, a coat, or a towel as a blanket.
Part 3: Organizing the Box
– The last step is to organize your first aid box in a way that makes it easy to find and use the items inside. Here are some tips to help you do that:
– Divide the box into sections: You can use zip-lock bags, plastic containers, or cardboard dividers to create separate sections for different types of items. For example, you can have one section for bandages, one for medications, one for tools, and so on.
– Label the sections: You can use stickers, markers, or labels to identify the sections and the items inside them. For example, you can write “Bandages”, “Pain Relievers”, “Scissors”, etc. on the bags or containers. This will help you locate what you need quickly and easily.
– Arrange the items by frequency of use: You can place the items that you use most often or need most urgently at the top or in the front of the box. For example, you can put bandages, antiseptic, and gloves in the most accessible section, and splints, cold packs, and blankets in the less accessible section.
– Check the expiration dates: You can check the expiration dates of the medications and other items that have them and replace them when they are expired. You can also write the expiration dates on the labels or containers to remind yourself when to replace them.
– Review the contents regularly: You can review the contents of your first aid box every few months and replenish any items that are missing, used up, or damaged. You can also update your first aid box according to your changing needs and preferences.
Tips
– You can customize your first aid box according to your specific needs and preferences. For example, you can add items that are relevant to your medical conditions, allergies, hobbies, or activities.
– You can also make multiple first aid boxes for different locations or purposes. For example, you can have one for your home, one for your car, one for your workplace, one for your travel bag, etc. You can adjust the size and contents of each box accordingly.
